Planning Environment
Download and run the planning tool,
Follower's its good to use planning tool before deployment and go through with Microsoft Planning doucment.
Prepare Environment
- Install .Net 3.5 Framwork

- When AD DS installed Role Service option can see.
Prepare IIS
Run this cmdlet on PS (As an Administrator)
PS C:\> Import-Module ServerManager
PS C:\> Add-WindowsFeature NET-Framework,RSAT-ADDS,Web-Server,Web-Static-Content,Web-Default-Doc,Web-Http-Errors,Web-Http-Redirect,Web-Asp-Net,Web-Net-Ext,Web-ISAPI-Ext,Web-ISAPI-Filter,Web-Http-Logging,Web-Log-Libraries,Web-Http-Tracing,Web-Windows-Auth,Web-Client-Auth,Web-Filtering,Web-Stat-Compression,Web-Mgmt-Console,Web-Scripting-Tools –Restart

Above command will install all the features required and reboot the machine.
Or else you can do this on One by one…… (Check the Planning doc (Ch-4) its shows which Features need to be)

Now go to the setup folder of Lync Server 2010, and double click setup.exe
- Install Visual C++ Redistributable

- Deployment Start

Now you will be presented with a familiar looking wizard (If you did OCS 2007 R2) that will guide you through the install process. The Active Directory preparation steps and provided. This will Prep Schema, Forest and Domain.

Before this check AD condition of the PDC and other ADC.
- Schema Prep


- Forest Prep

Use as a Local domain(Target Domain)
- Domain Prep


- Prep Complete
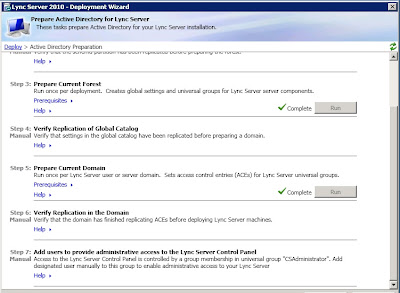
Give login Account to CSAdministrator, RTCUniversalServerAdmins and RTCUniversalServerUser Priviledges.
Main deployment wizard screen and select the option to Prepare first Standard Edition Server (top right hand option). This will install a copy of SQL 2008 Express, Lync Server core installation files and create an RTC database – let this take its course and once complete you’ll be presented with the following dialogue.


Preparation Complete

Prepare single Standard Edition server

Finish the First Std server prep
Create a topology
Go to the Deployment Wizard > Install Topology Builder
Open the topology builder (TB) via the start menu, as explained earlier Lync offers a difference in Architecture to OCS 2007, OCS2007R2.
The Central Management Store (CMS) is a SQL database where you publish your chosen topology, this takes away the dependency for Lync to require the AD for configuration purposes and is required to complete the installation. Its connected with LsCP,PS.TB .
- Topolgy builder > Create New topology

- Define SIP Domain on topology,

- Define Site name
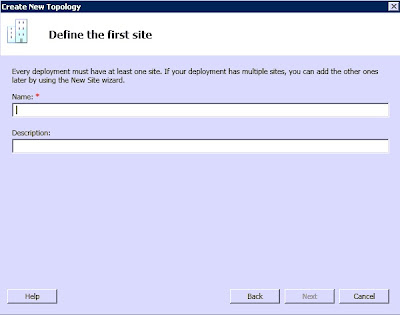

- Need to show the Front End as a Current machine FQDN

> I’ll also be option for the Standard Edition Server Topology Ent (they’ll be no high availability and an additional SQL Express instance, this will host the user and application store and will be installed automatically upon publishing the policy).
- Collocation (Mediation Server)
I’ll choose to collocate the Mediation Server, but in live environment should be think about server resources and recommendations.

Use default settings on next steps
- Share should have Read/Right -
create it locally and ensure the account you are currently using to run the topology builder has run the topology builder has read/write access to this folder. I’ll call my folder and share name “Share”.

Need to modify topology for https://admin.zss.int and install your CMS on (all things being equal you should have one option here, your previously specified pool FQDN). And Publish it.
Next the Central Management Store is created. When the wizard completes a text based to-do list can be presented with remaining tasks, you’ll need to create three DNS A records for the simple URLs specified – these should be directed to the IP address of your
Lync Server (I won’t cover this). I will cover the final install step – the server components install.

- Create DNS Record and also A Records on AD DNS

DNS Records
To connect client (Automatically) from Internal DNS Server and Host offering this Service should have to have FQDN.
- To finish your server installation you need to head back to the Lync Server Deployment Wizard, now accessible via the start menu. Choose Install or Update Lync Server System to continue
Choose step 1 to install a local CMS and choose the option to retrieve directly from the CMS.


Upon completion, click finish.


After this process it shows restart needed. Then again go to the wizard and continue it.

Internal CA
Setup automatically identify the CA authority (AD CA).

You have to select the sip domain in above.

- Assign Certificate

- start your services, or just click step,If you want to verify everything went A okay there is an option to launch services.msc.

- Before start the Control panel you have to start

- Lync Control Panel


- To make sure the Service started or not ,
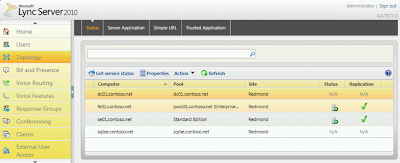
- To enroll a user
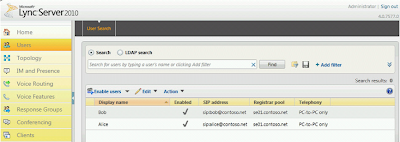
by cmdlts ,
Enable-CsUser -Identity madushka -SipAddress sip:madushka@uctechies.com -RegistrarPool lync.uctechies.com
Enjoy !!!!
Comments
Post a Comment